“Unlock the secrets of Boston fern plant care with our expert tips.”
Meet the Boston Fern – a charming green buddy that is all the rage for a reason, especially among indoor plant enthusiasts!
Famous for its lush, feathery fronds, it has become a popular option among plant fans. Beyond its aesthetic appeal, Boston fern also has air-purifying qualities.
Its graceful greenery adds a touch of natural elegance to any space, making it a perfect indoor plant. Despite its delicate appearance, the Boston Fern is hardy as it thrives in indirect light and high humidity. However, learning to care for Boston fern is essential to maintain its vibrancy.

Boston Fern Houseplant Care / Source: Unsplash
This article delves into the essentials of Boston fern plant care. We will cover everything your indoor plant needs to keep thriving.
So, whether you are a green thumb looking to enhance your indoor space or a novice plant parent eager to raise a fern, this guide is for you.
About Boston Fern Plant (Nephrolepis exaltata)
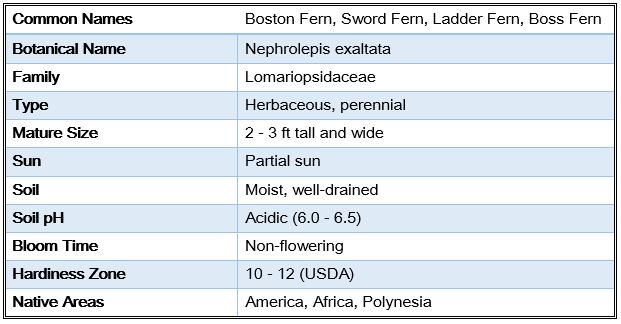
Boston Fern Characteristics
Boston fern is a common ornamental plant often grown as a houseplant in cold climates. Also called sword fern, it is a member of the Lomariopsidaceae family. Boston fern is native to humid forests of northern South America, Mexico, and the West Indies. In ideal growing conditions, it can grow as tall as 7 feet.
Moreover, as an evergreen fern, it is hardy in zones 9-11. While you can grow it outdoors in mild climates, it readily adapts to indoor containers.
Boston fern strikes broad fronds with leaflets on either side, like a green flag waving. The fronds can reach up to 4 feet long and 6 inches wide, with tiny spore parties underneath. Each leaflet is like a triangle with slightly wavy edges.
The Boston Fern likes to stand tall, while ‘Bostoniensis’ goes for a graceful arch. And guess what? It sends out long, thin runners that root to form new fern friends wherever they touch the ground.
Boston Fern Care Tips
Boston ferns are known for being a bit picky, but don’t fret! You can keep your Boston fern happy and healthy with the proper care. Here’s a simple guide to making your Boston fern thrive:
Bright, Indirect Light
Keep your indoor Boston ferns where they get bright, indirect light. If it’s too shady, the leaves may not look great; Avoid placing it to direct sunlight , they might get burnt.

Boston Fern in Filtered Sunlight / Flickr / Hornbeam Arts
So, a porch with filtered sunlight in the morning and shade in the afternoon is perfect for them. They like it just right!
For example, your porch is a perfect spot for your plant. Placing your plant there will give it plenty of filtered sun in the morning and afternoon shade.
That way, you will enjoy its lush fronds while adding a touch of greenery to your porch. Thus, keep your plant in this sweet spot, and it will enjoy its ideal home.
Boston Ferns Thrive in Rich, Well-Drained Soil
Growing Boston (sword fern) in organically rich, well-draining soil is essential. Preparing the garden bed with a mix of fresh potting mix, moist soil, compost, and peat benefits your outdoor ferns. This combination not only provides essential nutrients but also ensures proper drainage
Moreover, adding compost and peat improves fertility and moistens the soil. As a result, your sword fern will have a favorable environment to flourish.
However, if you have a potted Boston fern, go for a peat-based potting mix with perlite to boost drainage. Proper drainage is crucial, as poorly drained soil may lead to root rot.
Suitable soil with proper drainage is critical for Boston fern plant care. It allows you to create an ideal foundation to keep your plants thriving.
Avoid Overwatering
Adequate watering is also a critical factor for Boston Fern plant care. Remember that your ferns see an active growth season in spring and summer.
If you have indoor ferns, maintain soil moisture by watering weekly. However, outdoor ferns need more frequent watering, especially in warm climates.
Moreover, it is critical to strike a balance while watering your fern. Ensure that the soil is moist and not saturated. Check the soil with your hand to determine the optimal watering schedule.
The fern’s lush foliage may drop rapidly if the soil dries out. In colder months (fall and winter), reduce watering to every other week, considering its dormancy. In addition, be cautious not to let the fronds dry out entirely during these colder months. Adapting your watering to the changing seasons will support the health and vitality of your Boston fern year-round.
Protect Your Boston Fern Plant from Extreme Heat and Cold
Boston ferns prefer comfy temperatures, whether indoors or outdoors. For indoor Boston ferns, maintain temperatures between 60 to 75 degrees Fahrenheit (15 to 24 degrees Celsius) during the day. In addition, avoid exposing your fern to drafts or sudden temperature fluctuations. Keep indoor ferns away from heaters and air conditioners to prevent stress.
When growing Boston ferns outdoors, aim for a similar temperature range. Ideally, outdoor temperatures should be between 50 – 75 degrees Fahrenheit (10 to 24 degrees Celsius). Your plants love a mild and consistent environment, so protect them from extreme heat or cold.
Moreover, if there is a risk of frost, bring outdoor ferns inside or provide protective covers. Maintaining a suitable temperature will create a cozy atmosphere for your ferns.
Boston Fern Need Low Fertilization
Boston ferns are hardy and can tolerate various conditions and soil types. However, it doesn’t mean your fern will thrive in poor soil. These plants still need some care.
If you have outdoor plants, add 1 inch of compost and mulch yearly to keep the soil happy. Indoor ferns are easy to care for, too. Feed your indoor potted Boston fern a diluted 20-10-20 liquid houseplant fertilizer once a month when it grows actively. Just use half the recommended strength.
However, when fall and winter arrive, hold off on the feeding to give your plant a break. Remember that, during that time, ferns don’t need extra nutrients.
So, a little boost for outdoor ferns annually and a gentle monthly treat for the indoor ones when it’s warm, is ideal to keep your plants healthy.
Prune Your Boston Ferns for Healthy Growth
Pruning is also essential in Boston fern plant care and has great perks!
Trimming away old or yellowing fronds helps the fern direct energy to new growth, keeping it looking lush and vibrant. In addition, remove crowded or damaged leaves to improve air circulation.
Moreover, pruning is especially handy for indoor ferns. It helps you manage your plant size, look neat, and prevent fungal issues. So, when should you prune your Boston fern?
Well, prune it during the active growing season in spring and summer when the fern is putting on its best show. Snip away any unsightly or unhealthy fronds with clean scissors or pruning shears.
Boston ferns are resilient, and a good trim encourages fresh, green growth. So, give your fern a little grooming session when it’s thriving. It will repay you with a healthy and beautiful appearance.
Common Problems and Diseases

Sword Fern / Source Unsplash
Here are a few of the most common Bost fern issues and diseases:
Graying Leaves and Yellowing Fronds
Something is wrong if you notice your Boston fern’s fronds are changing color.
When the leaves turn gray, it is often a sign that your plant is not getting enough water. The longer the soil stays dry, the grayer the leaves get as the plant’s growth slows down.
Moreover, if the color change goes beyond gray and turns into lighter greens, yellowing, or browning, it is a more serious red flag. This could state a pest problem or a disease requiring effective treatment intervention. Keep a close eye on your plant’s color changes to catch and treat any issues early on.
Drooping Fronds
Imagine your fern’s fronds drooping and looking thin in hanging baskets – not the picture of health! This happens when Boston ferns don’t get enough light.
The more light, the lighter the greenery becomes. Dark green fronds? That signals low light, and they start to hang down like they are tired.
To fix it, boost the light levels. While Boston ferns can handle low light, they thrive better with occasional brighter spots. Think of them as low-maintenance, but they appreciate a change of scenery for optimal growth.
Moreover, they also prefer medium light, at least a few hours of indirect sunlight daily. Avoid putting them in a spot facing south; that sunlight is too strong. Spotting drooping and discoloration might indicate a more significant issue – a disease or pests nibbling on your plant. Keep an eye out!
Root Rot
Be on the lookout for root rot – a problem that crops up when the soil stays too wet for too long. Imagine it’s like a plant getting a cold from too much water. To shield your Boston fern, ensure the soil has good drainage.
Moreover, don’t drown your Boston ferns with water; they like a balanced amount. Signs of trouble include sad, droopy fronds and a not-so-happy plant. If you see mushy, brown roots when checking, that’s a red flag for root rot.
To prevent this soggy situation, find the right balance – not too dry or soaked. Your fern will stay perky, and you’ll keep root rot at bay, ensuring a thriving and joyful plant.
Spider Mites
Watch out for sneaky spider mites – these tiny troublemakers can make your Boston fern look faded and dotted. If you see little spots on the fronds, it’s their handiwork. They are like invisible painters leaving speckles behind.
Give your fern a misting session and keep up the humidity to keep them at bay. It is like giving your plant a spa day!
Moreover, if the mites stick around, use insecticidal soap to show them the door. Consider it a gentle but effective eviction notice for these unwanted guests.
By pampering your fern with mist and managing humidity, you keep it happy and say “no thanks” to those pesky spider mites. Your fern will stay fresh, green, and free from their dotting antics.
Brown or Tan Bumps on Fronds
Protecting your ferns from scale insects is an essential Boston fern plant care tip. These tiny troublemakers hide themselves as small brown or tan bumps on your fern’s fronds. If you spot these bumpy invaders, it is time to take action!
These pests are unwelcome guests at your plant party, sucking out sap and causing harm. However, fear not; you can show them the exit door using neem oil or insecticidal soap. It’s like giving your fern a protective shield against these tiny intruders.
Apply these remedies, and your plant will thank you for evicting the scales. Keep an eye out for those sneaky bumps, treat your fern with neem oil or insecticidal soap, and you will ensure a pest-free and healthy haven for your Boston fern.
Can You Propagate Boston Fern?

Sword Fern Propagation / Flickr / Cristina Sanvito
Propagating Boston ferns is an excellent way to expand your fern collection. You can share plants with friends or rejuvenate an older fern. It is a rewarding process that lets you enjoy the beauty of these lush green plants throughout your home.
Propagating Boston Fern is a straightforward process. The most common method is through division, where you separate a mature fern into smaller sections, each with its roots and crowns. It allows you to create new plants that share the characteristics of the parent fern.
However, remember to choose a mature Boston fern with multiple crowns when propagating. Here is how to propagate Boston fern:
-
Choose a mature Boston fern with many crowns or “clumps” of leaves.
-
Gently remove the fern from its pot and shake off excess soil. You will see the root ball with several crowns connected by rhizomes.
-
Carefully separate the crowns. You can use your hands or a clean, sharp knife. Each separated section should have roots attached.
-
Place the separated crowns into new pots with fresh, well-draining potting mix. Water the newly potted divisions.
-
Provide the propagated ferns with the same care as mature plants. Keep the soil moist and provide indirect light.
-
Be patient as the new plants establish themselves. You know your propagation efforts have succeeded once they show signs of new growth.
Conclusion
The Boston fern is a favorite for many reasons. It brings nature’s beauty indoors with its lush fronds. Boston fern plant care is also easy. Thanks to their hardiness, these plants can thrive in various conditions.
From misting to occasional grooming, your Boston fern rewards you with vibrant greenery. Tackling common issues like spider mites involves gentle methods, ensuring a happy fern. Remember, it’s all about balance – not too dry or wet.
Creating the perfect environment lets your Boston fern thrive, adding life to your home. So, enjoy the journey of nurturing this timeless and graceful houseplant. Let the Boston fern’s elegance enhance your space, making it a greener, more refreshing haven for all to enjoy.
FAQs
Can you plant Boston ferns outdoors?
Of course! Boston ferns can thrive outdoors if you provide the right conditions. Choose a shaded or partly shaded spot with well-draining soil. These ferns love indirect sunlight but only a little, especially when avoiding the intense midday sun. Before planting, enrich the soil with compost for added nutrients. Keep the soil consistently moist, as Boston ferns enjoy a humid environment.
Outdoor Boston ferns can bring a touch of lush greenery indoors. They are ideal for your garden or patio, creating a vibrant natural atmosphere. With the proper care, your Boston ferns will flourish outdoors.
Can I grow ferns in hanging baskets?
Ferns make fantastic choices for hanging baskets. You can choose fern varieties with graceful drooping fronds, like Boston or maidenhair. However, proper drainage is vital to keep these plants happy. So, ensure your hanging basket has good drainage, use suitable soil, and regularly water your fern.
Moreover, hang your basket where your fern can enjoy indirect sunlight or light shade. With their cascading greenery, ferns in hanging baskets look lovely, adding a touch of nature to your eye level.
What potting mix should I use for my Nephrolepis exaltata?
Choose a well-draining and lightweight potting mix for your Nephrolepis exaltata (Boston fern). A mix formulated for ferns or general-purpose potting soil with added perlite or sand works well. This helps maintain proper moisture levels for the fern’s roots. Ensure the pot has excellent drainage to prevent waterlogging. Regularly check the soil’s moisture and water when the top inch feels slightly dry. With the right potting mix and care, your Boston fern will thrive, showcasing its lush green fronds.
Dive into the world of Houseplant Joy!
Transform your space into a haven of greenery and style with our expert plant care tips and aesthetic inspiration.
Discover the secrets to keeping your indoor oasis thriving and learn creative ways to elevate your decor with plants.
Let’s create a lush and joyful world together. Don’t miss out – follow us on Facebook, Insta, Twitter, TikTok, and Pinterest, and let the green magic unfold!
