HousePlantJoy is supported by our audience. When you purchase through one of our links, we may earn a small affiliate commission. As an Amazon Associate I earn from qualifying purchases. Your cost is not affected.
==================
ZZ Plant Propagation: The Key to Multiplying Your Indoor Oasis
ZZ plants, with their glossy, dark green foliage, are a popular choice for plant enthusiasts everywhere. Not only are they stunning additions to any indoor space, but they’re also known for their remarkable resilience and low-maintenance needs. But what if you could cultivate this botanical beauty even further, transforming a single plant into a thriving collection? The answer lies in the fascinating world of ZZ plant propagation.
This practice allows you to create new ZZ plants from your existing one, multiplying your indoor jungle without breaking the bank. Whether you’re a seasoned plant parent or just starting your botanical journey, ZZ plant propagation is an accessible and rewarding way to expand your plant family. Intrigued by the prospect of multiplying your favorite low-fuss foliage friend? Dive deeper into this guide and discover the secrets to successfully propagating your ZZ plant!
ZZ Plant Propagation: Easy Steps to Grow Your Own Houseplant
Propagating a ZZ plant is a rewarding way to expand your collection or share this beautiful plant with friends and family. There are several methods of propagation, including division, leaf cuttings, and stem cuttings, each with its own set of steps and considerations. Whether you’re looking to create new plants for your home or as gifts, understanding the propagation process is key to ensuring healthy, thriving ZZ plants.
In this post we’ll explore the basics of ZZ plant propagation, highlighting the necessary tools, techniques, and best practices to help you successfully grow new ZZ plants from existing ones. Whether you’re a seasoned gardener or a beginner, this guide will provide you with the knowledge and confidence to propagate your ZZ plant with ease.
What are ZZ Plants?
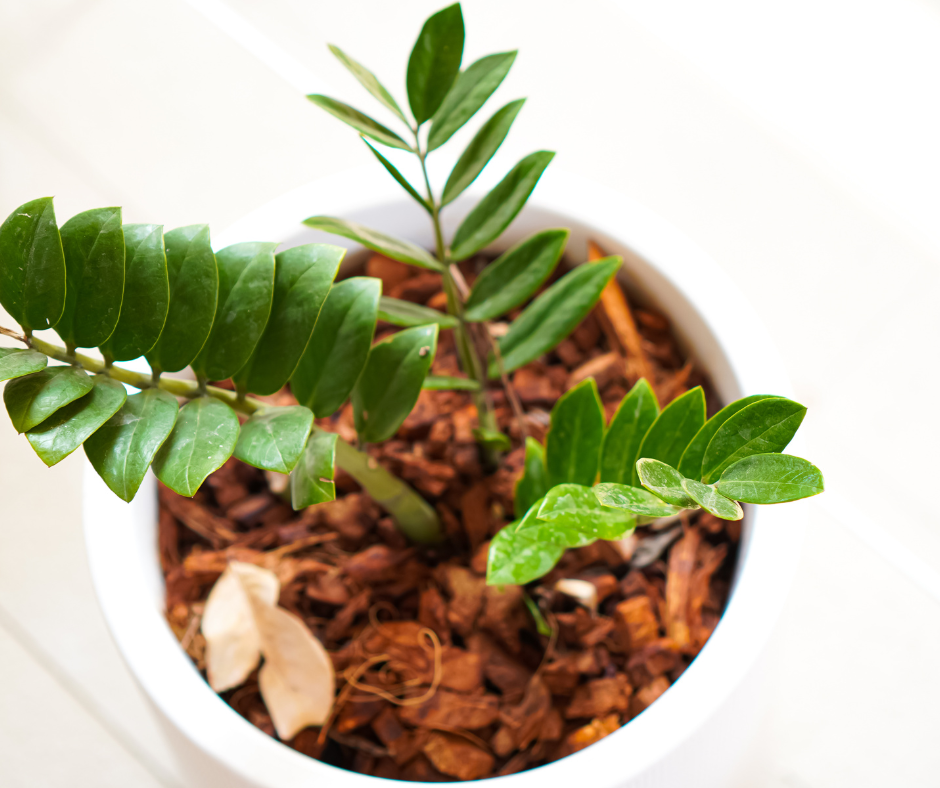
ZZ plants, or Zamioculcas zamiifolia, are popular houseplants known for their striking appearance and easy care.
Propagating ZZ plants can be a simple and rewarding way to expand your collection or share with friends.
Whether you’re using stem cuttings or dividing the rhizomes, the process is straightforward and doesn’t require much gardening expertise.
In this blog post, I’ll guide you through the best practices for propagating ZZ plants. We’ll explore different techniques, from cutting healthy stems to gently teasing apart the root ball.
Each method has its benefits, and I’ll share tips from my personal experience to help ensure your success.
Propagation:
I tried propagating my ZZ plant by cutting and division. Both methods worked well, but I had more success with dividing the root ball. It was exciting to see new growth sprouting from the separated rhizomes.
Toxicity:
One thing to note is that ZZ plants are toxic if ingested, especially to dogs. Therefore, I always keep mine out of reach of my pets and kids.
I’ve found ZZ plants to be a fantastic addition to my home. Their dark green, glossy leaves add a vibrant touch, and they require very little fuss.
Understanding ZZ Plant Propagation
When I first started propagating ZZ plants, I found it fascinating. These plants, known for their glossy leaves and low maintenance, can be propagated in a few simple ways. Let me walk you through them.
Methods:
- Stem Cuttings: Cut a healthy stem from the plant. Place it in water or directly into soil.
- Division: Divide the root ball or rhizomes carefully by hand and plant them in new pots.
- Leaf Cuttings: Place a leaf in water or soil, and new roots will eventually form.
Step-by-Step Guide for Stem Cuttings:
- Prepare the Cutting: Select a healthy stem and cut it just below a node.
- Water or Soil: Choose between placing the cutting in water or a well-draining soil mix.
- Wait: Be patient. New roots and growth can take a few weeks.
Things to Remember:
- Use clean tools to avoid infections.
- Be patient; propagation takes time.
- Check for pests regularly to keep the new plants healthy.
Materials Needed:
| Item | Purpose |
|---|---|
| Sharp Knife or Scissors | Cutting the stem or leaves |
| Water or Soil | For planting the cuttings |
| Pots | For new plants |
| Perlite | To improve soil drainage |
Choosing the Right Time of Year
The best time to propagate a ZZ Plant is during the spring or early summer. This is when the plant is actively growing and can recover more quickly from being cut or divided.
Spring and early summer provide the warmth and sunlight that ZZ Plants need to thrive.
Avoid propagating during the winter. During this season, plants grow slower due to the cold weather, and the low light makes it harder for new cuttings to develop roots.
Also, during winter, the ZZ Plant focuses on surviving rather than growing. Waiting until the plant’s active growing season increases the chances of successful propagation.
Gathering Necessary Supplies
To propagate a ZZ Plant, you need several key supplies.
First, get clean, sharp scissors or a knife to make precise cuts.
Consider using a rooting hormone to encourage faster root development.
Have small pots or trays ready, along with a well-draining soil mix. A mix of potting soil and perlite works well.
Clear plastic bags or a plastic wrap can help maintain humidity around the new cuttings. This moisture is vital for root growth.
Also, label your pots if you’re propagating multiple plants to avoid confusion.
Leaf Cuttings
Using leaf cuttings to propagate a ZZ Plant is quite simple. First, I select a healthy leaf from the ZZ Plant. Then, I cut it off carefully with a clean, sharp knife.
I let the leaf dry for a few hours to prevent rot. Next, I place the leaf in a well-draining potting mix.
I make sure that about 1 inch of soil covers the bottom part of the leaf. Keeping it slightly moist is crucial.
I place the pot in a warm spot with indirect sunlight and water it occasionally.
This method is slow but effective for those who prefer a step-by-step process.
With time, the leaf will develop roots and eventually grow into a new plant. Patience is key here, as it can take several months to see significant growth.
Division
Dividing the ZZ Plant is another effective way of propagation.
When the plant becomes too large for its pot, I carefully remove it from the container.
I look for natural divisions in the root ball or rhizomes.
Using my hands, I gently tease apart the sections rather than cutting them.
It’s important to be gentle to avoid damaging the roots.
Once I separate the sections, I plant each division in its own pot with a mixture of potting soil and perlite.
I water them lightly and place them in a spot with indirect sunlight.
This method gives almost instant results, as each divided section already has a developed root system. It usually results in a stronger, quicker-growing plant.
Stem Cuttings
For stem cuttings, I first choose a healthy stem from the ZZ Plant. I cut a segment that has a few leaves attached.
After that, I let the cut end dry out for several hours to reduce the risk of rot.
Once dry, I plant the cut end in moist potting soil.
I ensure that the bottom few inches are covered with soil to stabilize the cutting.
I keep the soil just moist enough and place the pot in a warm and bright location.
Stem cuttings usually root faster than leaf cuttings. This method is a good balance between the simplicity of leaf cuttings and the immediacy of division.
With proper care, the stem cutting will develop roots and turn into a new plant.
Leaf Cutting Method Steps
- Gather the Materials: You’ll need a healthy ZZ plant, a sharp, clean knife or scissors, a small pot, well-draining soil, and some water.
- Preparation: Choose a healthy leaf from your ZZ plant. Make sure it’s free from any damage or disease.
- Cut the Leaf: Carefully cut the leaf close to the base of the stem. Try to make a clean cut to avoid damaging the plant.
- Pot the Leaf: Fill your pot with well-draining soil. Place the cut end of the leaf into the soil, burying it about an inch deep.
- Watering: Lightly water the soil. Keep it moist but not waterlogged.
- Placing: Place the pot in a bright, indirect sunlight spot.
- Monitoring: Check regularly for new growth, which may take several weeks. Be patient!
Division Method Steps
- Prepare the Plant: Carefully remove the ZZ plant from its pot.
- Identify the Rhizomes: Locate the thick, tuber-like structures called rhizomes. These are what you’ll be dividing.
- Separate the Rhizomes: Gently tease apart the rhizomes by hand. Avoid cutting or breaking them to reduce the risk of damage.
- Prepare the Pots: Have new pots ready with a well-draining mix of potting soil and perlite.
- Plant the Divisions: Place each divided rhizome into its new pot, ensuring it’s covered with soil. The rhizome should be just below the surface.
- Water Lightly: Water the new plants lightly. Keep the soil moist but not soggy.
- Place in Indirect Light: Place the new pots in a location with bright, indirect light. Monitor the new growth over the next few weeks.
Stem Cutting Method Steps
- Materials Needed: You’ll need a sharp knife or scissors, a clean glass of water, and a pot with well-draining soil.
- Select a Stem: Choose a healthy stem from your ZZ plant.
- Cut the Stem: Make a clean cut, taking a section of stem with at least two leaf nodes.
- Rooting in Water: Place the cut stem in a glass of water. Make sure at least one leaf node is submerged.
- Change Water: Refresh the water every few days to keep it clean and promote root growth.
- Transfer to Soil: Once roots develop, which may take several weeks, transfer the stem to a pot filled with well-draining soil.
- Water and Light: Water the soil lightly and place the pot in bright, indirect light. Monitor the plant as it grows.
Initial Plant Care
Congrats on propagating your ZZ plant babies! Now they need a little extra TLC to help them settle in. Think of them like little ones – they need a bright spot but out of the direct sun’s glare, which can be a bit too much for their delicate leaves.
On watering, go easy on the faucet! ZZ plants are drama queens when it comes to sitting in soggy soil. I find it best to let the soil dry out almost completely before giving them another drink. Remember, overwatering is a common enemy of new ZZ cuttings, and it can make them rot.
Humidity is also important, but don’t worry if your house isn’t a tropical paradise. Normal indoor humidity should be okay. If your place feels super dry though, you can give them a little spa treatment with a pebble tray or a small humidifier. This will add some extra moisture to the air around your plants, which will help their roots grow nice and strong.
Long-Term Growth Tips
As your ZZ plant grows, its needs might change a little. Don’t worry, these guys are pretty low-maintenance, but here are some tips to keep them happy.
ZZ plants actually like being a bit snug in their pots, so repotting only becomes necessary when the roots start pushing out of the drainage holes, or the plant looks crowded. When that day comes, choose a new pot that’s just an inch or two wider than the current one.
During spring and summer, when your ZZ is actively growing, you can give it a little boost with some fertilizer. Think of it like a vitamin for your plant! A balanced, water-soluble fertilizer diluted to half strength will help encourage nice, lush growth. Just be sure not to overdo it – a little goes a long way.
To keep your ZZ looking its best, you can give its leaves a gentle wipe down with a damp cloth every now and then. This removes dust and helps the plant absorb more light for healthy growth. You can even give it a quick shower if you like!
Keep an eye out for common houseplant pests like spider mites or scale insects. These little guys can be a nuisance, but if you catch them early, you can easily get rid of them with insecticidal soap or neem oil.
Root Rot Prevention
The worst enemy of a ZZ plant? Soggy feet! Root rot is a real pain, and it usually happens when you give your plant a little too much love with the watering can.
To avoid this watery nightmare, there are a few things you can do. First, make sure your ZZ is planted in soil that drains well – like a good detective, it needs to be able to breathe! Second, use a pot with drainage holes – think of it as letting out all that built-up moisture. The key is to water only when the top inch of soil feels dry.
Every now and then, give your ZZ a quick root check. Healthy roots should be firm and white. If they feel mushy or smell funky, then root rot might be lurking. Don’t panic! Just grab some clean scissors, snip off the rotten bits, and repot your ZZ friend in fresh, dry soil.
Remember, watering sparingly and using a pot with drainage holes are your best friends when it comes to preventing root rot. And giving your ZZ good air circulation around the roots helps too – think of it as keeping things fresh down there!
Dealing with Pests
Ugh, those pesky spider mites and mealybugs! They love to munch on ZZ plant leaves, leaving behind yellow splotches and weird damage. Like checking for monsters under the bed, give your ZZ a good once-over every few weeks to catch these little buggers early.
If you find some creepy crawlies, quarantine your plant right away! Don’t let them spread the party to your other greenery. Luckily, there are ways to fight back. I use a mixture of water and gentle dish soap to give them a good shower and wash them off. Neem oil is another weapon you can add to your arsenal – it helps keep those pests under control. Remember, the key is to keep an eye out and act fast to keep your ZZ happy and pest-free!
Addressing Slow Growth
ZZ plants are known for taking their sweet time growing, but sometimes even these low-maintenance guys can seem to stall out completely. What gives?
Well, the first culprit is often not enough light. Think about it – they wouldn’t be growing on the jungle floor if they needed to be sunbathers, right? So, give your ZZ a bright spot away from direct sun.
Watering can also play a role. Too much water and your ZZ might feel like it’s drowning, while underwatering can leave it parched and grumpy. The key is to find the happy medium – water only when the soil feels dry to the touch.
Finally, your ZZ might be feeling a little cramped! If it’s rootbound, those roots won’t have any space to grow, which can stunt its growth overall. Repotting into a slightly bigger pot with fresh soil can give it the space it needs to spread out and start thriving again.
The Benefits of Propagating ZZ Plants
Propagating ZZ plants is a fun and rewarding hobby. One of the biggest benefits is that it can save me money.
Instead of buying new plants, I can create new ones from the ZZ plant I already have. This way, my home gets greener without spending more.
ZZ plants are low-maintenance and easy to care for. Propagating them means I get more of these hardy plants, which can thrive in low-light and low-water conditions.
This makes them perfect for adding greenery to different parts of my home.
Another great benefit is sharing. When I propagate ZZ plants, I have the chance to share them with friends and family. It’s a wonderful way to give a living gift that grows over time.
Propagating also helps to revive struggling plants. If one of my ZZ plants isn’t doing well, I can take cuttings or divide its rhizomes. This way, I can start fresh with a healthy new plant.
Here are a few benefits in a list:
- Cost-effective: No need to buy new plants.
- Low-maintenance: ZZ plants are resilient and easy to care for.
- Shareable: Great for gifting to others.
- Rejuvenate plants: Helps revitalize struggling ZZ plants.
Seeing new roots and leaves grow is a satisfying experience. It brings a sense of accomplishment and joy to my gardening activities.
ZZ Plant Propagation: Cultivating Your Indoor Jungle
With this guide, we’ve unlocked the secrets to multiplying your beloved ZZ plant. We’ve explored various propagation methods, from stem and leaf cuttings to division, empowering you to choose the technique that best suits your needs and comfort level. We’ve also covered the essential steps for each method, ensuring you have a clear roadmap to success. Remember, patience is key with ZZ plant propagation, but witnessing those new roots and leaves emerge is a truly rewarding experience.
So, are you ready to transform your single ZZ plant into a thriving collection? With the knowledge and guidance provided here, you have all the tools necessary to embark on this exciting propagation journey. We wish you the very best of luck in multiplying your indoor oasis and witnessing the magic of ZZ plant propagation unfold! Don’t hesitate to revisit this guide as you begin your propagation adventure, and feel free to share your experiences and ZZ plant parenthood journey with fellow plant enthusiasts!
How do you propagate a ZZ plant from its leaves?
Keep the soil slightly moist but not too wet, and place the pot in a warm, bright area away from direct sunlight.
What's the best way to propagate a ZZ plant from a stem cutting?
Can you propagate ZZ plants in water and how to do it?
What are the steps to propagate a ZZ plant in soil?
How long does it take for a ZZ plant cutting to root when placed in water?
What is the proper method to cut ZZ stems for successful propagation?
Make the cut just above a leaf node for the best chance of successful propagation. Always use clean tools to avoid infection.
Craving More Plantastic Content?
Dive deeper into the world of houseplants with Houseplant Joy!
We share engaging content, product reviews, and connect you with a vibrant community passionate about plant care and propagation – just like your ZZ plant!
Join us on:

